P.S. Free 2025 Linux Foundation CKS dumps are available on Google Drive shared by Exams-boost: https://drive.google.com/open?id=1DoRSaYxY2Fbe6pRcsfRZPy0d_8NN0iZ3
Candidates all around the globe use their full potential only to get Linux Foundation CKS certification. Once the candidate is a Linux Foundation certified, he gets multiple good career opportunities in the Linux Foundation sector. To pass the CKS Certification Exam a candidate needs to be updated and reliable Certified Kubernetes Security Specialist (CKS) (CKS) prep material. There is a ton of CKS prep material available on the internet.
The CKS certification exam is a rigorous and challenging test of the candidate's knowledge and skills in securing Kubernetes platforms. CKS exam consists of 17 questions, which are a combination of multiple-choice and hands-on tasks. The hands-on tasks require the candidate to demonstrate their ability to perform specific security-related tasks in a Kubernetes cluster. CKS Exam is conducted online and is proctored to ensure the integrity of the certification process.
In order to meet the different demands of the different customers, these experts from our company have designed three different versions of the CKS reference guide. All customers have the right to choose the most suitable version according to their need. The PDF version of the CKS exam prep has many special functions, including download the demo for free, support the printable format and so on. We can make sure that the PDF version of the CKS Test Questions will be very convenient for all people. Of course, if you choose our CKS study materials, you will love it.
NEW QUESTION # 71
You have a Kubernetes cluster with a deployment named 'web-app' running a web applicatiom You suspect that a specific user with the username 'malicious-user' might be attempting unauthorized access to the cluster To investigate this, you want to use Kubernetes audit logs to identify any attempts made by this user to access resources within your namespace 'my-namespace'.
How would you configure Kubernetes audit logging and filter the logs to isolate potential malicious activity by 'malicious-user within the 'my- namespace' namespace?
Answer:
Explanation:
Solution (Step by Step):
1. Enable Kubernetes Audit Logging:
- Create a ConfigMap named 'audit-policy' with the following content:
- Apply the ConfigMap to the cluster: bash kubectl apply -f audit-policy-yaml 2 Configure the Audit Backend: - Create a ConfigMap named 'audit-sink' with the following content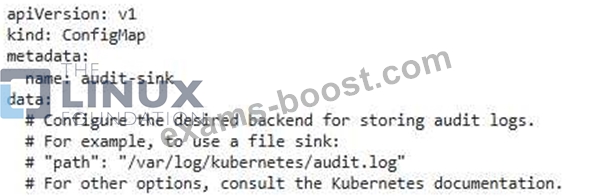
- Apply the ConfigMap: bash kubectl apply -f audit-sink-yaml 3. Filter Audit Logs: - Use ' kubectl logs -f -n kube-system' to view the audit logs. - Filter tne logs for requests made by 'malicious-user' Within 'my-namespace'- bash kubectl logs -f -n kube-system I grep "user.name=malicious-user" I grep "namespace-my-namespace" - This command will display any audit log entries related to requests made by 'malicious-user' within the my-namespace' namespace. 4. Analyze the Logs: - Examine the logs for suspicious activity, such as attempts to access sensitive resources, perform unauthorized actions, or exploit vulnerabilities. - Use the information gathered from the audit logs to take appropriate security measures. Note: - The 'lever field in the audit policy can be customized to control the level ot detail in the audit logs. For example, 'Metadata' logs only the request metadata, while 'Request' logs all details of the request - The audit logs will be stored according to the configuration of the 'audit-sink' ConfigMap. - This is a basic example. You may need to adjust the filters and analysis techniques based on your specific security requirements.
NEW QUESTION # 72
You are running a multi-tenant Kubernetes cluster where different teams deploy their applications. You are tasked with ensuring isolation between teams and preventing unauthorized access to sensitive dat
a. Describe how you can leverage pod security policies (PSP) and network policies to achieve this goal.
Answer:
Explanation:
Solution (Step by Step):
1. Define Pod Security Policies:
- Create separate PSPs for each team with different security constraints:
- Resource Limits: Limit the resources each team's pods can request (CPU, memory).
- Capabilities: Restrict specific capabilities like ' SYS_ADMIN' or 'NET_ADMIN'
- Security Context: Control the user and group IDs, privileged escalation, and SELinux labels for pods.
- Volume Types: Allow only specific types of volumes (e.g., emptyDir, hostPath, persistentV01umeClaim).
- Example PSP for Team A: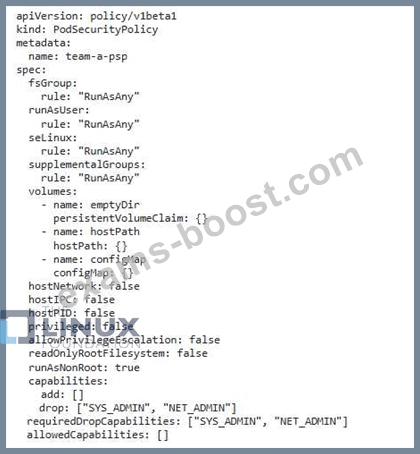
2. Apply PSPs to Teams: - Use 'kubectl apply -f team-a-psp.yaml' to apply the PSP for Team A. - Create and apply similar PSPs for other teams. - Apply these PSPs as admission controllers in your cluster to enforce them on all pods. 3. Configure Network Policies: - Define network policies to control communication between pods within different teams: - Ingress Policy: Control whicn pods can initiate connections to pods in otner teams. - Egress Policy: Control which pods can receive connections from pods in other teams. - Example Network Policy for Team A: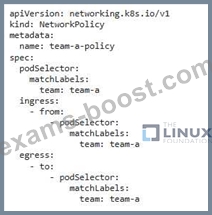
4. Apply Network Policies: - Use ' kubectl apply -f team-a-policy-yamp to apply the policy for Team A. - Create and apply similar policies for other teams. Result: - These PSPs and network policies enforce isolation between teams, limiting their access to resources and preventing unauthorized communication. - Teams can deploy their applications within their defined policies, minimizing the risk of cross-team vulnerabilities. - This approach ensures a secure and isolated environment for multi-tenant deployments.
NEW QUESTION # 73
You are setting up a Kubernetes cluster that requires strong security measures. You need to implement several security best practices, including.
- Pod Security Policy: Implement a default Pod Security Policy that restricts resource requests, limits privilege escalation, and disables container root access.
- Network Policy: Configure network policies to restrict communication between pods within the cluster, enforcing a principle of least privilege.
- Admission Controller: Use the 'PodSecurityPolicys admission controller to enforce the defined Pod Security Policy rules.
How would you set up a secure Kubernetes cluster, including the configuration of a default Pod Security Policy, network policies, and the 'PodSecuntyP01icy' admission controller, to enforce these security best practices?
Answer:
Explanation:
Solution (Step by Step) :
1. Create a Default Pod Security Policy:
- Create a YAML file named 'psp.yaml' with the following content: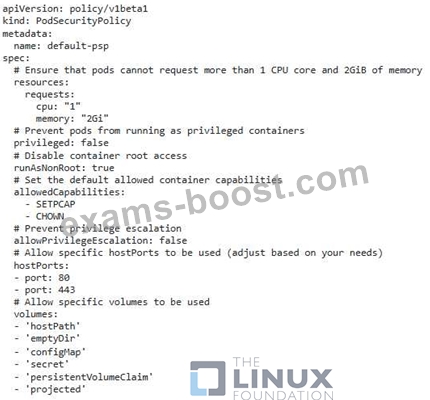
2. Create Network Policies: - Create separate YAML files for each network policy you need. - For example, a policy to restrict communication between pods in the 'frontend' and 'backend' namespaces could be defined as: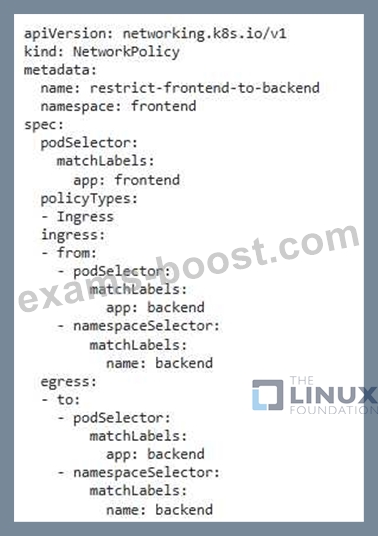
3. Enable the 'PodSecurityPolicy' Admission Controller: - Modify the Kubernetes API server configuration (e.g., vetc'kubernetes/manifests/kube-apiserver.yaml') to enable the 'PodSecurityPolicy' admission controller: - Add the following line: '--admission-control=NamespaceLifecycle,LimitRanger,ServiceAccount,PodSecurityPolicy' 4. Apply the Configuration: - Apply the 'psp.yaml' and network policy files to the cluster using 'kubectl apply -f -yamr - Restart the Kubernetes API server for the changes to take effect. 5. Test the Configuration: - Try to create a pod that violates the Pod Security Policy rules. - You should see an error message indicating that the PodSecurityPolicy is preventing the pod creatiom - Test the network policies by attempting to communicate between pods and verifying that traffic is restricted according to the defined rules. 6. Monitor and Adjust - Monitor the cluster for any potential issues caused by the security policies. - Adjust the policies as needed based on evolving security requirements and application needs. Note: It's recommended to use a tool like 'kubectl apply -f -s to pipe the content of the YAML files to the command for applying the resources.
NEW QUESTION # 74
SIMULATION
Create a PSP that will prevent the creation of privileged pods in the namespace.
Create a new PodSecurityPolicy named prevent-privileged-policy which prevents the creation of privileged pods.
Create a new ServiceAccount named psp-sa in the namespace default.
Create a new ClusterRole named prevent-role, which uses the newly created Pod Security Policy prevent-privileged-policy.
Create a new ClusterRoleBinding named prevent-role-binding, which binds the created ClusterRole prevent-role to the created SA psp-sa.
Also, Check the Configuration is working or not by trying to Create a Privileged pod, it should get failed.
Answer:
Explanation:
Create a PSP that will prevent the creation of privileged pods in the namespace.
$ cat clusterrole-use-privileged.yaml
---
apiVersion: rbac.authorization.k8s.io/v1
kind: ClusterRole
metadata:
name: use-privileged-psp
rules:
- apiGroups: ['policy']
resources: ['podsecuritypolicies']
verbs: ['use']
resourceNames:
- default-psp
---
apiVersion: rbac.authorization.k8s.io/v1
kind: RoleBinding
metadata:
name: privileged-role-bind
namespace: psp-test
roleRef:
apiGroup: rbac.authorization.k8s.io
kind: ClusterRole
name: use-privileged-psp
subjects:
- kind: ServiceAccount
name: privileged-sa
$ kubectl -n psp-test apply -f clusterrole-use-privileged.yaml
After a few moments, the privileged Pod should be created.
Create a new PodSecurityPolicy named prevent-privileged-policy which prevents the creation of privileged pods.
apiVersion: policy/v1beta1
kind: PodSecurityPolicy
metadata:
name: example
spec:
privileged: false # Don't allow privileged pods!
# The rest fills in some required fields.
seLinux:
rule: RunAsAny
supplementalGroups:
rule: RunAsAny
runAsUser:
rule: RunAsAny
fsGroup:
rule: RunAsAny
volumes:
- '*'
And create it with kubectl:
kubectl-admin create -f example-psp.yaml
Now, as the unprivileged user, try to create a simple pod:
kubectl-user create -f- <<EOF
apiVersion: v1
kind: Pod
metadata:
name: pause
spec:
containers:
- name: pause
image: k8s.gcr.io/pause
EOF
The output is similar to this:
Error from server (Forbidden): error when creating "STDIN": pods "pause" is forbidden: unable to validate against any pod security policy: [] Create a new ServiceAccount named psp-sa in the namespace default.
$ cat clusterrole-use-privileged.yaml
---
apiVersion: rbac.authorization.k8s.io/v1
kind: ClusterRole
metadata:
name: use-privileged-psp
rules:
- apiGroups: ['policy']
resources: ['podsecuritypolicies']
verbs: ['use']
resourceNames:
- default-psp
---
apiVersion: rbac.authorization.k8s.io/v1
kind: RoleBinding
metadata:
name: privileged-role-bind
namespace: psp-test
roleRef:
apiGroup: rbac.authorization.k8s.io
kind: ClusterRole
name: use-privileged-psp
subjects:
- kind: ServiceAccount
name: privileged-sa
$ kubectl -n psp-test apply -f clusterrole-use-privileged.yaml
After a few moments, the privileged Pod should be created.
Create a new ClusterRole named prevent-role, which uses the newly created Pod Security Policy prevent-privileged-policy.
apiVersion: policy/v1beta1
kind: PodSecurityPolicy
metadata:
name: example
spec:
privileged: false # Don't allow privileged pods!
# The rest fills in some required fields.
seLinux:
rule: RunAsAny
supplementalGroups:
rule: RunAsAny
runAsUser:
rule: RunAsAny
fsGroup:
rule: RunAsAny
volumes:
- '*'
And create it with kubectl:
kubectl-admin create -f example-psp.yaml
Now, as the unprivileged user, try to create a simple pod:
kubectl-user create -f- <<EOF
apiVersion: v1
kind: Pod
metadata:
name: pause
spec:
containers:
- name: pause
image: k8s.gcr.io/pause
EOF
The output is similar to this:
Error from server (Forbidden): error when creating "STDIN": pods "pause" is forbidden: unable to validate against any pod security policy: [] Create a new ClusterRoleBinding named prevent-role-binding, which binds the created ClusterRole prevent-role to the created SA psp-sa.
apiVersion: rbac.authorization.k8s.io/v1
# This role binding allows "jane" to read pods in the "default" namespace.
# You need to already have a Role named "pod-reader" in that namespace.
kind: RoleBinding
metadata:
name: read-pods
namespace: default
subjects:
# You can specify more than one "subject"
- kind: User
name: jane # "name" is case sensitive
apiGroup: rbac.authorization.k8s.io
roleRef:
# "roleRef" specifies the binding to a Role / ClusterRole
kind: Role #this must be Role or ClusterRole
name: pod-reader # this must match the name of the Role or ClusterRole you wish to bind to apiGroup: rbac.authorization.k8s.io apiVersion: rbac.authorization.k8s.io/v1 kind: Role metadata:
namespace: default
name: pod-reader
rules:
- apiGroups: [""] # "" indicates the core API group
resources: ["pods"]
verbs: ["get", "watch", "list"]
NEW QUESTION # 75
You are running a Kubernetes cluster with a deployment named "my-app" that uses a container image from a public registry. You suspect that a recent deployment update may have introduced a vulnerability in one of the containers. Describe how you can use container image scanning tools like Trivy to identify and address the vulnerability.
Answer:
Explanation:
Solution (Step by Step) :
1. Install and Configure Trivy:
- Install Trivy on your system or Within your Kubernetes cluster. Trivy is a versatile vulnerability scanner that can scan container images, filesystems, and applications.
2. Scan the Container Image:
- Run Trivy against the container image used by the "my-app" deployment.
bash
trivy image example/nginx:latest
3. Analyze the Scan Results:
- Review the Trivy scan report, which will list any vulnerabilities detected in the container image. The report will provide information like the vulnerability's severity, description, and potential impact.
4. Address the Vulnerability:
- If vulnerabilities are discovered, take appropriate actions to mitigate the risk. This could involve:
- Updating the Container Image: If a newer version of the container image is available with the vulnerability patched, update the deployment to use the updated image.
- Implementing Security Measures: Consider implementing additional security controls within your containers, such as restricting network access, limiting container privileges, or using security-enhancing tools.
- Accepting the Risk: If the vulnerability is deemed low risk and updating or mitigating it is not feasible, you may choose to accept the risk and monitor the vulnerability closely.
5. Integrate with CI/CD Pipeline:
- Integrate Trivy into your CI/CD pipeline to automatically scan container images before they are deployed to your Kubernetes cluster. This helps to catch vulnerabilities early and prevents them from being introduced into your production environment.
NEW QUESTION # 76
......
Free domo for CKS exam materials is available, we recommend you to have a try before buying CKS exam dumps, so that you can have a deeper understanding of what you are going to buy. CKS training materials contain both questions and answers, and you can have a quickly check after practicing. We have a professional team to collect and research the latest information for the exam, and you can receive the latest information for CKS Exam Dumps if you choose us. We have online and offline service for CKS exam dumps, and the staff possesses the professional knowledge for the exam, if you have any questions, you can consult us.
CKS Latest Exam Dumps: https://www.exams-boost.com/CKS-valid-materials.html
P.S. Free & New CKS dumps are available on Google Drive shared by Exams-boost: https://drive.google.com/open?id=1DoRSaYxY2Fbe6pRcsfRZPy0d_8NN0iZ3
